
How to Setup MENU TIGER to Your Self-Service Kiosk
Last Updated: March 13, 2025
Streamlined operations. Improved customer experience. Increased revenue.
These are the top priorities you should have in line to ensure your spot in a saturated market like this. This means offering something that is beneficial for both you and your customers.
Enter the self-service kiosk—a technology that can revolutionize your restaurant with just a tap to guarantee a boost in your efficiency, increase revenue, and enhance guest satisfaction.
But here’s the good news: By adding the MENU TIGER QR code menu software, you’ll empower this kiosk even more.
In this comprehensive guide will dig deeper into it and specifically explain the process for you.
What’s a self-service kiosk, and how does it work?
A self-service kiosk is an interactive, computer-based terminal that allows users to access information, transactions, or services without direct human assistance.
They are built with touchscreen displays, allowing users to navigate a virtual menu and select options as well as enter information.
Its software is tailored to the specific service provided by the kiosk.
For instance, a retail kiosk might include a product catalog, while a ticketing kiosk would offer booking and payment options.
These are usually connected to the internet or internal networks, enabling real-time data processing, updates, and communication with the backed system.
These kiosks are commonly found in various settings, such as retail stores, airports, restaurants, hotels, hospitals, and government offices.
This only indicates the demand for this technology in the industry.
In fact, self-service kiosk statistics reported that the market size was valued at $12.1 billion in 2023 and is forecasted to reach $23.7 billion by the end of 2036, expanding more than 5.6% cumulative annual rate growth.
This year, the industry size is assessed at $12.66 billion, according to Research Nester.
How to set up a self-service kiosk for restaurants
Suppose that you already have the hardware at hand for your business. The next thing to do is to set it up.
Here’s how:
1. Choose a kiosk browser
The primary purpose of a kiosk browser is to lock the device into your web application, ensuring that users can only interact with the designated interface and preventive access to other parts of the system.
Here are some of the kiosk browsers for specific operating systems you can choose from:
- Windows: Kiosk Mode in Windows 10/11
Windows offers a built-in kiosk mode that is easy to set up and highly secure.
- Android: Kiosk Lockdown Browser Apps
For Android devices, various Kiosk Lockdown Bowser apps, such as Sure Lock and Kiosk Browser Lockdown, are available. These apps ensure a focused and secure environment.
- iOS: Guide Access
Guided Access is a built-in feature in iOS that restricts the device to a single app.
- Linux: Full-Screen Mode in Chrome/Firefox
For Linux systems, you can use Chrome or Firefox in full-screen mode with limited access.
2. Set up the platform
If you’ve already chosen the browser you’ll use, the next step is to install the kiosk on your device.
For Windows: Set up Kiosk Mode
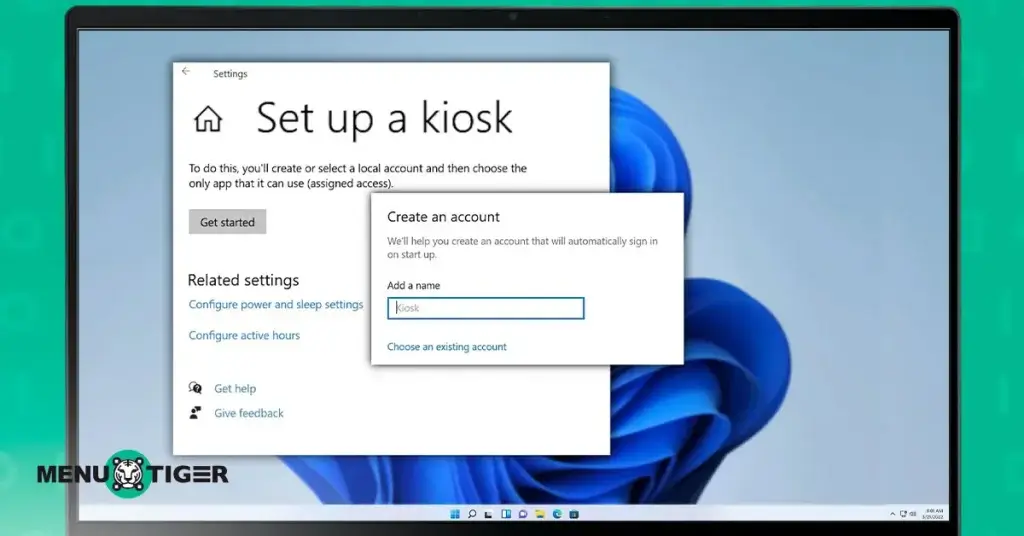
- Click the Start menu and select the gear icon to open Settings.
- Go to Accounts.
- Select the Family & Other Users option on the left-hand side panel.
- Scroll down to find Set up a kiosk (assigned access) and tap it.
- Click on Get Started and select the user account that will be used for the kiosk. If necessary, create a new local user account specifically for kiosk purposes.
- Choose the application that will run in kiosk mode. For web applications, select a browser like Microsoft Edge that will run it.
Create a browser shortcut with your web app URL. Right-click on your desktop and select New > Shortcut. Then, place the shortcut in the startup folder. Open the Run dialog by pressing Win + R on your keyboard, then type shell: startup and press Enter. This will open the folder.
For Android: Use a kiosk app
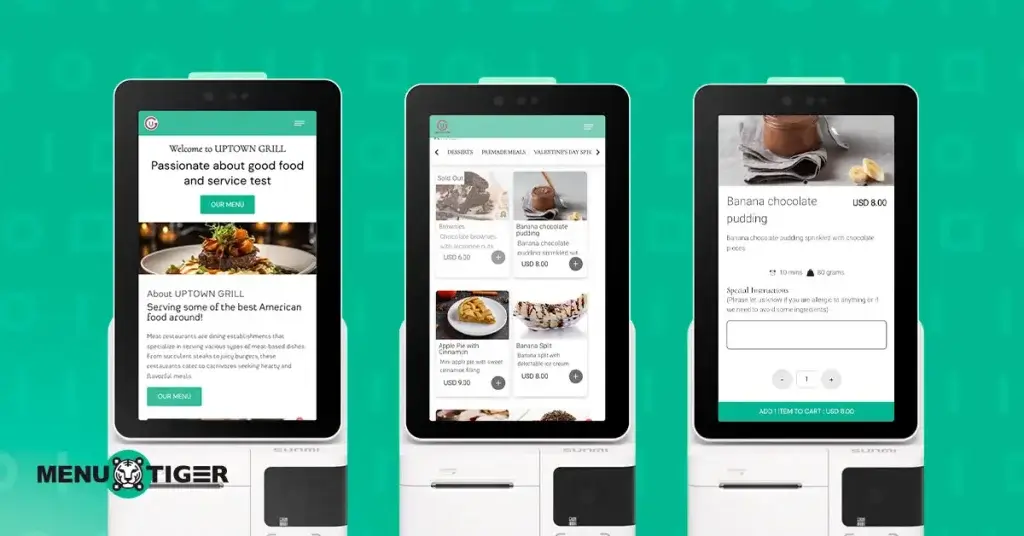
- Launch the Google Play Store on your Android device, then type Surelock or Kiosk Browser Lockdown on the search bar.
- Select the desired app from the search results and tap Install.
Configure the kiosk app to load your web application URL and set up the device for kiosk mode.
- Lock the device to kiosk mode.
- Disable Home Button
Use the kiosk app’s settings to disable or restrict the Home button, Recent Apps button, and Back button. This ensures that users cannot exit the kiosk application.
- Activate Kiosk Mode
Turn on the kiosk mode feature within the app to lock the device to your web application. This usually involves activating the Start Kiosk Mode option or similar within the app.
- Verify settings
Test the device to ensure it is locked to the web application and that all restricted features are inaccessible. Try pressing the home button or recent apps button to confirm they are disabled.
For iOS: Use Guided Access
- Tap the Settings icon on your iOS device.
- Scroll down and select Accessibility.
Under the General section, find and tap on Guided Acess. Toggle the switch to turn it on.
Under Guided Acess settings, tap Passcode Settings. Select Set Guided Access Passcode and enter your passcode.
- Launch the Safari browser on your iOS device, enter the URL of your web application, and wait for it to load. Triple-click the Home button (or the Side button on devices without the Home button) to bring up the Guided Access menu.
- Tap on Options and toggle hardware buttons such as Volume, Motion, Keyboards, and Touch if you want to restrict it. Click Start to begin the Guided Access session. The device will now be locked to the Safari app displaying your web application.
For Linux: Use a full-screen browser
- Configure a browser like Chrome or Firefox to open in full-screen mode with your web application URL on startup.
- Modify the startup applications.
For GNOME Desktop environment:
- Access the startup applications settings by searching for Startup Applications in the Activities overview.
- Click on Add and enter a name (e.g., Kiosk Mode Browser)
- In the Command field, enter the path to the startup script you created.
- Click Add to save the new startup application.
For other desktop environments:
- Access the startup applications settings from the system settings or preferences menu.
- Follow a similar process as described for Gnome to add the startup script to the list of applications that launch at startup.
- Use browser extensions or configurations to restrict access to other parts of the system.
3. Configure network and power
Ensure a stable and secure internet connection for the kiosk devices’ seamless operation.
A wired ethernet connection is often the most reliable option for a stable internet connection, but you can use a WiFi network if a wired connection is not feasible. Just make sure that the network provider is strong and stable.
Additionally, reliable power is essential to keep kiosks operational at all times. Consider both the power source and backup options.
4. Consider the security of the self-service kiosk in restaurants
Keeping the software and web application up-to-date is crucial for protecting against known vulnerabilities and ensuring the system's smooth operation.
So, regularly update the operating system to ensure that the latest security patches and features are installed.
This maintains the robust security posture and performance of your kiosks for daily operations.

How to set up the MENU TIGER smart QR code menu software
1. Create a digital menu
Make sure you have an existing MENU TIGER account.
If you don’t have one, here’s an easy guide to create it:
1. Create an account by filling in your active email address, password, and phone number.
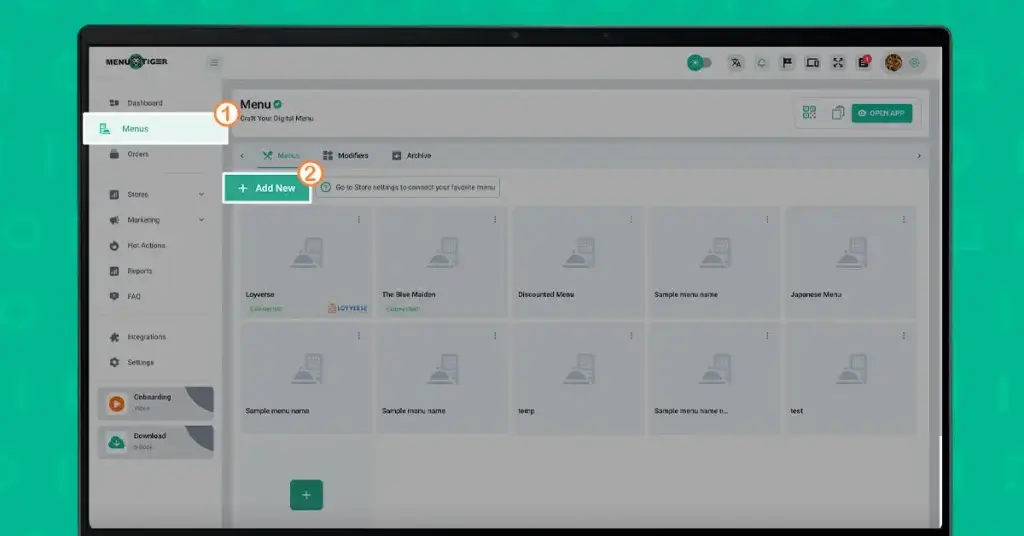
2. Click the Menus icon on the left side of the panel, choose Default Menu, and tap +Add New to start importing the details about your food items.
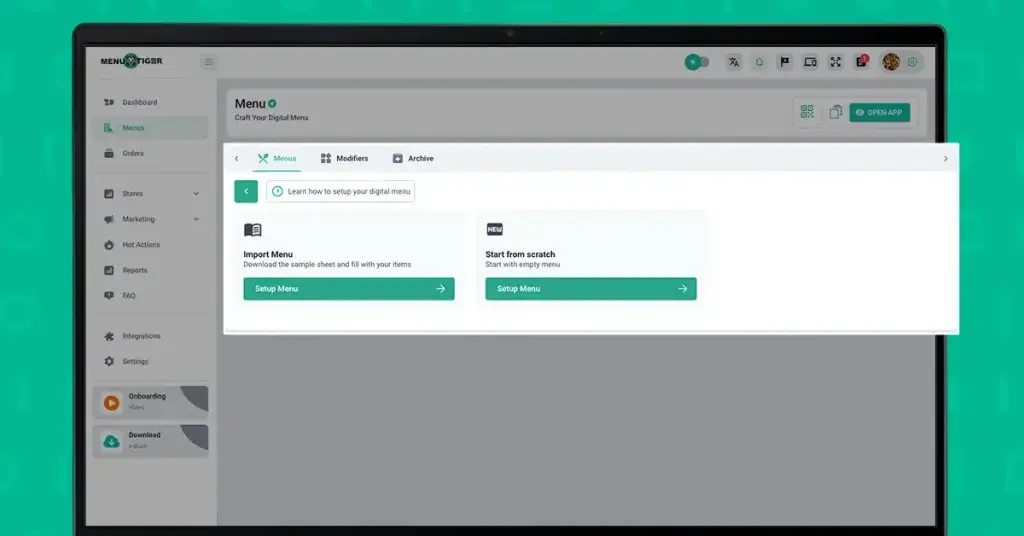
3. You can import your menu into a spreadsheet form, download MENU TIGER’s spreadsheet menu template, or start entirely from scratch.
4. Select the plus icon to create your food categories.
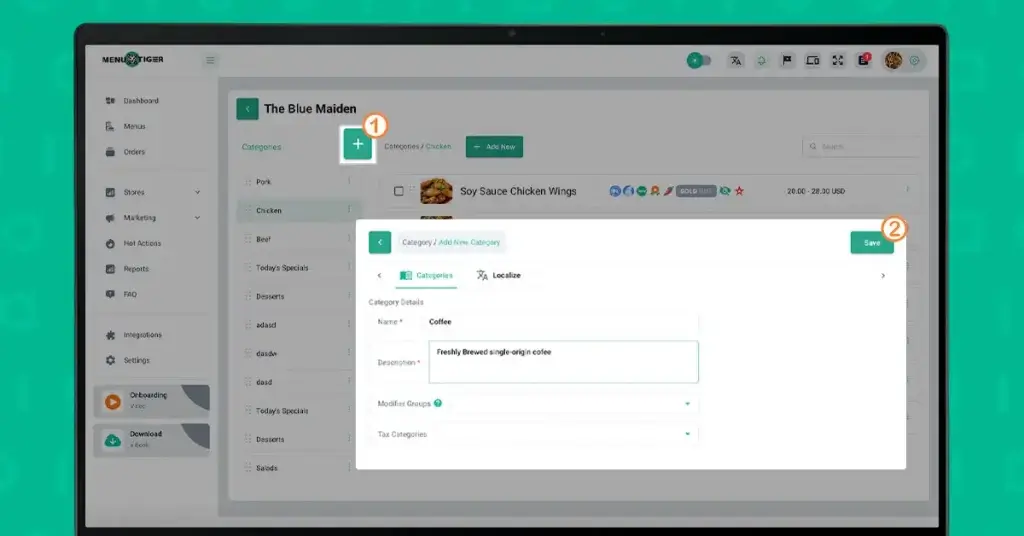
5. Then, create your food list by putting items in each category.
2. Create a Table for the Store
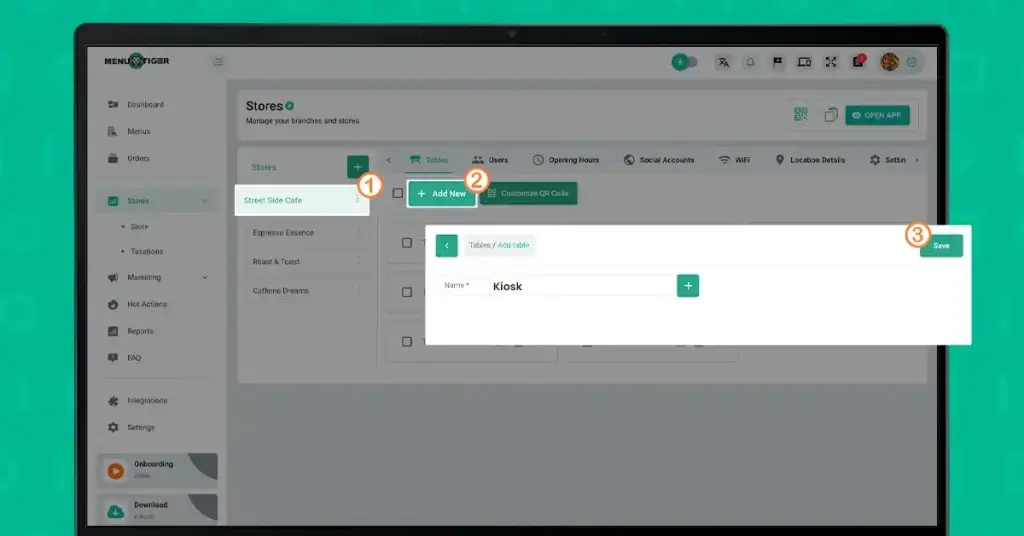
Setting up restaurant branches in the software.
On the same left side panel, go to the Stores section and click the Table + button to create a QR code menu for all of your restaurant’s tables.
Then, choose a specific Table that you will use or assign for the kiosk software.
3. Disable Order Notification
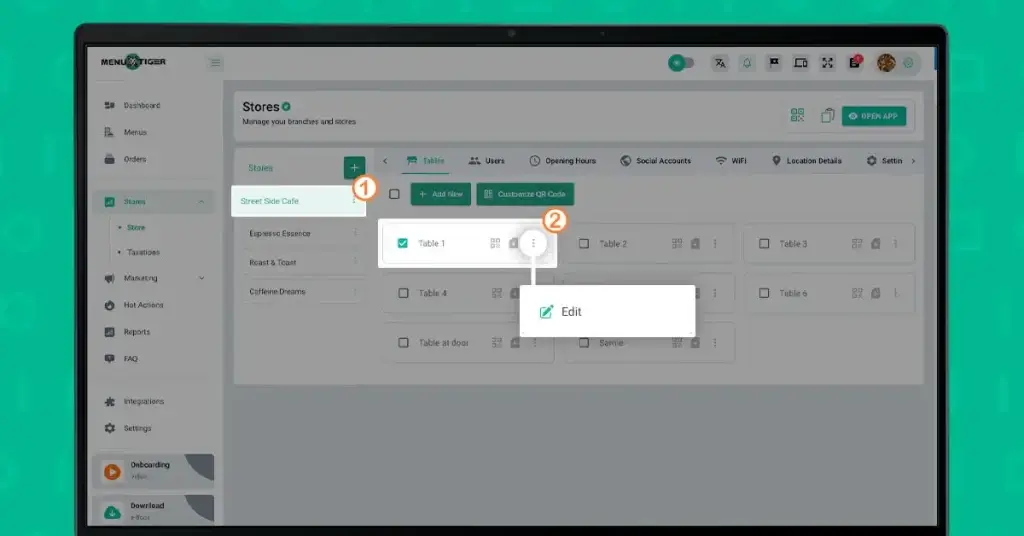
Select the specific store where you’ll setup the kiosk. Locate the Table assigned for the kiosk. Click the three-dot icon to open further options, tap Disable order notification label.
This step ensures that the kiosk will not display order notifications, maintaining focus on the digital.
Note: You can use any table for your kiosk so long as you disable the order notification label.
4. Scan the QR code and configure the kiosk
Scan the QR code associated with the kiosk table to copy the URL. Paste this URL to the kiosk application so your digital menu loads directly to the kiosk.
7 compelling benefits of using self-service kiosks for restaurants
If you’re still doubting whether it’s worth investing, here’s a list of benefits you can get once you deploy one in your restaurant.
Increased efficiency and speed
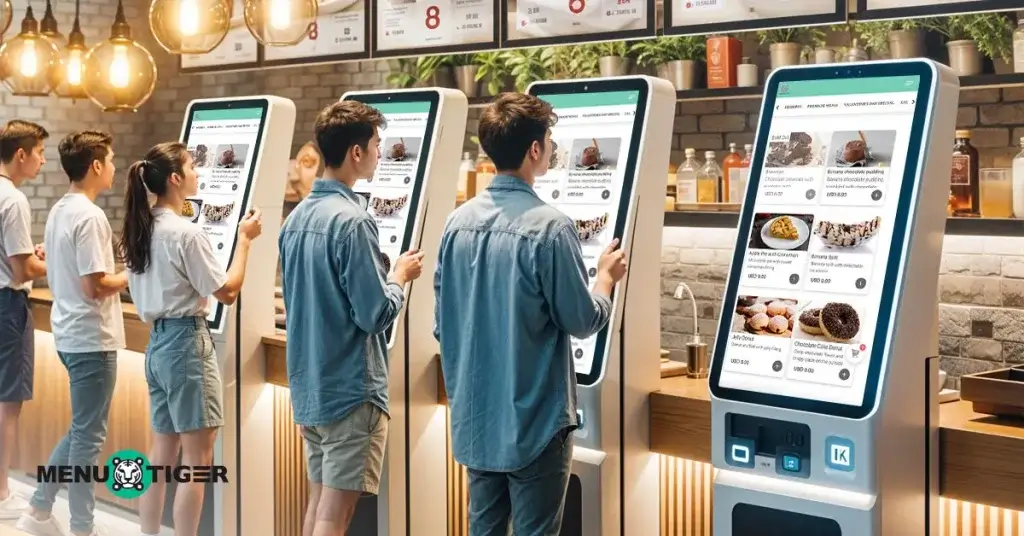
One of the most notable advantages of having kiosks is the increased efficiency they bring to the ordering process.
Traditional methods can be time-consuming, especially during peak hours when lines are long and customers are in a hurry.
Kiosks streamline this process by allowing customers to place their orders directly, reducing wait time significantly.
This faster service means more customers can be served in a shorter period, enhancing overall throughput and boosting sales.
Enhanced order accuracy
Order accuracy is crucial in the restaurant industry.
Miscommunication between customers and staff can lead to incorrect orders, which can be frustrating for customers and costly for the business.
The use of a self-service food kiosk minimizes these errors by letting customers input their own orders.
Aside from that, you can have alternative options like printed QR codes on table tents placed beside your kiosk, especially when you still invested in one unit.
In this way, you’ll be able to maximize the tools you have and provide alternative ways to streamline the order process without compromising its accuracy.
Increased revenue opportunities using a self-service kiosk
These kiosks are equipped with smart features that significantly boost sales. One such feature is the ability to upsell and cross-sell effectively.
Its interface can suggest additional items, meal upgrades, or complementary products during the ordering process.
For instance, if a customer orders a burger, the kiosk might suggest adding fries or a drink.
These prompts are strategically placed to encourage customers to spend a bit more, which can lead to higher average order values.
Improved customer experience
Customers value convenience and control over their dining experiences.
Interactive kiosks coupled with self-serve ordering tools like QR codes provide an engaging way for them to place their orders without feeling rushed when staff is waiting.
They can browse the men at their own pace, view images and descriptions of each item, and customize their orders to their exact preferences.
This self-paced ordering process makes their dining more enjoyable and less stressful.
Note: If you plan to use QR codes, make sure to include how to scan a menu using them to cater to those customers who haven’t used or encountered them yet.
Cost savings on labor

Labor costs are significant expenses for any restaurant.
By automating your ordering process, this advanced restaurant technology can help reduce the need for front-of-house staff.
This allows restaurant owners to allocate their workforce more efficiently, focusing on areas where human interaction is more critical, such as food preparation and customer service.
While kiosks will not eliminate the need for staff entirely, they can help manage staffing levels more effectively, leading to potential cost savings.
Data collection and insights
Data is invaluable.
With the use of self-service kiosks for restaurants, you can collect data on customer behavior, preferences, ordering patterns, and a survey for food and service that will help you gain insights and analyze what customers like during peak ordering times and which items are most popular.
You can use these insights to optimize their menu offerings, tailor marketing campaigns, and improve overall operations.
This will be a great tool for you to make informed business decisions like never before.
Adaptability and scalability
Kiosks offer a versatile solution that can be adapted to various restaurant formats, from franchise restaurants to fine dining.
They can be customized to meet the specific needs of each establishment, including language options for diverse customer bases and accessibility features for those with disabilities.
Moreover, kiosks are scalable, meaning they can grow with your business. As restaurant expands, adding more kiosks can help maintain efficiency and service quality.

Advancing services and operations with kiosks and Interactive restaurant QR code software
The demand for self-paced processes in the restaurant industry is seen as a trend.
Not only does it offer a level of personalization, but also expedites your services, reducing turnover times. This means you’ll be able to cater high volume of orders without any delays.
Having a self-service kiosk as an addition can function just that. With its interactive interface and engaging features, customers can truly enjoy dining without the stress of waiting in long lines.
The good news is that MENU TIGER can now be integrated into your kiosk, equipping you to be one step ahead of others.
Here, your customers can pay directly through the e-payment alternatives without having to go to the counter.
To experience these advanced tools, visit the website, sign up, and check out other advanced features.
FAQs
Chevy
Before joining MENU TIGER's Content Team, Chevy has been dabbling in literary arts for five years, specifically creative writing in a theatre company. She loves exploring her creativity through painting, photography, and contemporary dancing.


